Lordrush Fishing Strategy Guide: 7 Secrets of Master Anglers
Interested in being a guide contributor? Let us know.
While Lordrush is primarily a game of medieval warfare, alliances, and castle competitions, the recurring Fishing Tournament can be both a fun diversion as well as a source of additional account progression. This Fishing Strategy Guide will walk you through how to make the most out of it.
By mastering the mechanics of the Fishing event, you can secure high-value rewards including gems, mythic (orange) hero shards, Hero Gear materials, Governor Gear and Charm materials, and critical speedups. Best of all, these techniques can help you get a top 50 rank in the leaderboards as even a free-to-play Lordrush player.
This guide breaks down the seven foundational secrets used by the top-ranked anglers in every Lordrush Empire to maximize their rewards and accelerate their account tempo.
Just need the essentials? The Fishing Tournament event page has the reward tables and season rotation at a glance.
Fishing Tournament Fundamentals
The Fishing Tournament is a recurring event where players use Bait to lower a fishing line into the water, catching fish, treasure, and other collectibles to earn Fishing Points and Fishing Tokens. Fishing Points contribute toward milestone rewards and leaderboard rankings that provide additional rewards. Meanwhile Fishing Tokens are spent upgrading your fishing equipment throughout the event which allows you to fish deeper and catch more fish per bait. (Excess Fishing Tokens after maximizing your gear are redeemed for further awards.) Therefore, as you improve your gear, each fishing attempt becomes increasingly more valuable.
The event also features a collection system of fish that rotate on a “seasonal” basis. As you add new fish and other items to your collection, you unlock one-time bonuses of rare rewards like orange (mythic) general hero shards, governor gear and charm materials, Forgehammers, and more! Not to mention a bunch of gems and speedups. There are also unique skins and frames available in the event which also come with permanent stat upgrades for those who unlock them.
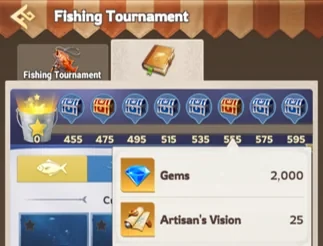
To play, you use a fishing attempt to open a skill-based minigame that sees you avoiding fish on the way down to get your hook to sink deeper and then catching fish on the return journey for points after the line bottoms out (or you hit too many fish on the way down).
Your success in the Fishing Tournament revolves around upgrading the three pieces of your Fishing Kit: the Line, Hook, and Sinker:
- The Line determines how deep your hook can travel, allowing access to new fish.
- The Hook increases the number of fish and treasures you can catch during each cast, improving your score and rewards.
- The Sinker allows your hook to descend more quickly and start at a deeper depth, making it easier to reach premium catches.
There are also consumable items you can purchase with gems to allow for more accidental fish contact on the way down, locate to you rare fish more clearly, and see clearly in the dark at low depths. Additionally, there are special premium consumable items such as:
- The Ocean Prospector, which is used in place of a Bait and increases the spawn rate of rare fish for that attempt
- The Horn of the Tide, which allows you to summon a specific fish on your next attempt
- Fishing Vouchers, which increase your Fishing Tokens and Fishing Points by 1.5x (used after the attempt has concluded)
Secret 1: The Tactical Opening (Why Your First Cast Is a Trap)
The most common mistake Lordrush players make is diving into the event the moment it opens and using a regular cast. Because your fishing equipment (Hook, Line, and Sinker) resets to level one every time the tournament returns, starting with a regular cast results in a low-point round while you scrape together points for the first few levels of gear to be able to have higher point rounds.
The Master Approach: Preparation Before the Line Hits the Water
- Check Your In-Game Mail and Chests First: Before your very first cast, navigate through the various event panels and your mailbox. You will find an Ocean Prospector Map and other assistance items, such as fishing vouchers, waiting for you.
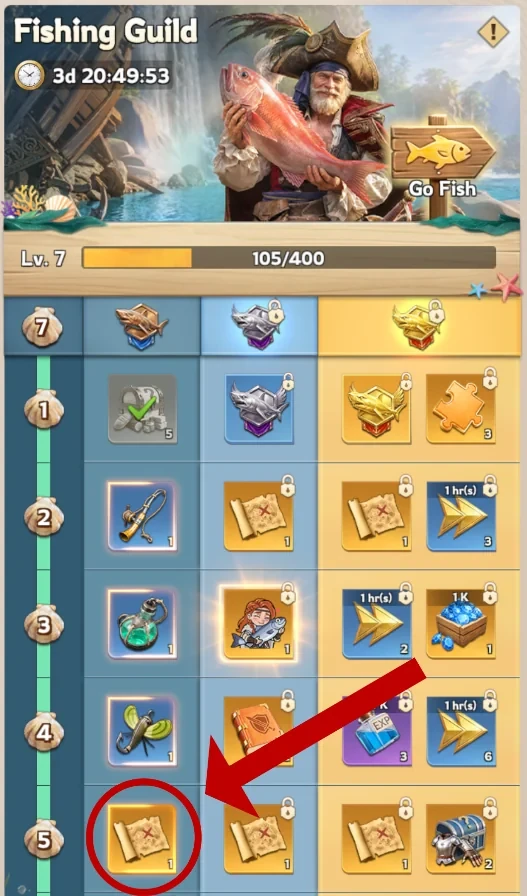
- Activate the Ocean Prospector Map Immediately: This map is your single most important early-game tool. When used, it temporarily boosts all of your fishing gear to Level 10 for that single cast and dramatically increases the spawn rate of high-point, rare fish.
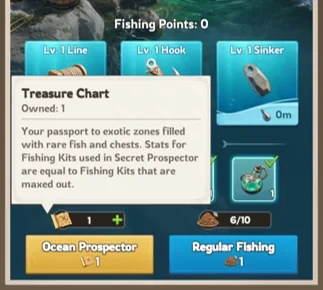
By doing this trick to start with a Level 10 gear set via the Prospector Map, you ensure your first round generates enough points to jumpstart your fishing gear upgrades, making every subsequent regular attempt significantly more profitable.
If you are a player who chooses to spend on the Fishing Tournament through pack purchases, the rule is simple: spend early. More premium items will help you build your fishing kit faster and further press your advantage to make the most out of subsequent attempts.
Secret 2: Edge Positioning (Mastering the Descent)
The Fishing Tournament is a game of two halves: the descent and the ascent. During the descent, your goal is to avoid every single fish. If you hit too many fish during your descent, it eventually triggers the "ascent" (the catch phase) prematurely.
Why Depth Matters
The rarest, highest-point fish and the most valuable treasure chests are more likely to be located deep in the water. Your goal should be to look for the 4-star and 5-star rewards waiting at 400+ meters.
The "Hug the Edge" Strategy
Master anglers recommend keeping your lure near the far left or far right edge of the screen during the descent.
- Reduced Risk: If your lure is in the middle of the screen, you are vulnerable to fish spawning from both directions. By hugging the edge, you effectively halve the number of obstacles you need to dodge.
- Observation Time: Having fewer fish coming at your lure gives you more time to mentally note the locations of rare fish and treasure chests.
- Depth Scouting: Memorize the approximate depth of high-value targets. This allows you to position your lure perfectly as you transition into the ascent phase.
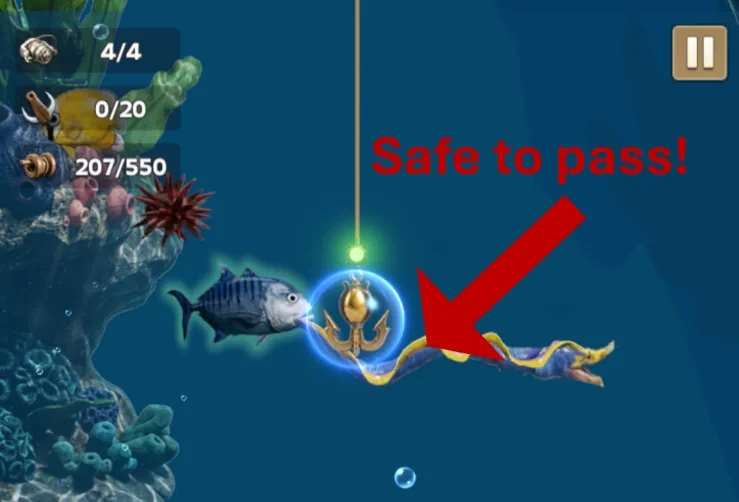
At some point, you will likely have to move your lure away from the edge on the descent based on the pathing of various fish. If you somehow are moving toward an unavoidable collision, try to collide with the back of the fish instead of the mouth. The hitbox of the hook interacting with the fish is smaller than the graphical representation of the fish and centers on the mouth. This means your hook can pass safely through the tails of the fish (particularly noticeable on bigger fish).
Secret 3: Marine Biology 101 (Fish Priorities and Mermaids)
On a regular fishing attempt, the water is not as abundant as it is during a Prospector Map round. You will see mostly 1-star and 2-star fish, with very few 3-star or 4-star variants. Learning to distinguish between them is the difference between a mediocre score and a leaderboard-topping one.
Priority Targets: The 2-Star Staples
Because most of your catch will consist of either 1- or 2-star fish, learning how to differentiate between them can essentially double your score in every regular Bait attempt. So look at the fishing guide and see which 2-star fish appear in every season and remember 3 or 4 of them so you will always have plenty of options when you are on the ascent and don’t see any 3-star or better fish. My favorites to do are the Mussel and Sea Urchin since they are the easiest to spot quickly, along with seasonal catches like the Freshwater Lobster for the same reason.
Remember, just because a fish is at a lower depth doesn’t automatically make it more valuable. There are plenty of 1-star fish swimming below 300m and plenty of two-star fish in the 100-300 range for you to choose from.
The Mermaid Multiplier
Mermaids appear frequently, but most are "low-point" traps worth only 2 points. So hooking a mermaid in an Ocean Prospector attempt could actually contribute to a worse score than getting one more 3-star fish.
Only prioritize a mermaid if she is wrapped in seaweed and has a distressed look on her face. Rescuing these specific mermaids provides a points multiplier to your entire catch for that round. If you don’t see this “seaweed signal”, then ignore her in favor of a 3-star or 4-star fish.
Chests Over Everything
Always grab treasure chests. While fish provide event points, chests provide direct account progression items (speedups, shards, etc.) that are often far more valuable to your long-term growth in Lordrush than a few extra ranking points.
Secret 4: Voucher Timing and the Upgrade Hierarchy After Your Cast
Managing your event points and vouchers is a "virtuous cycle". The goal is to reach maximum gear levels as early as possible to maximize the value of your finite daily attempts.
The Spending Multiplier: After you complete a high-scoring round (ideally your first Prospector Map round where you scored 800+ points), use that free Fishing Voucher from your inventory. This will further improve your Fishing Tokens by 1.5x.
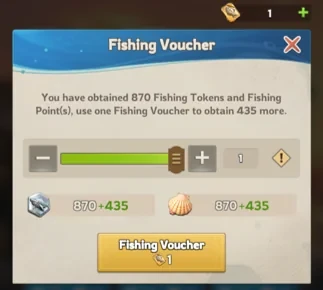
If you have done this well, you should easily have earned 1200-1500 Fishing Tokens before you even use your first Bait, which will help you upgrade your Fishing Kit early on and maximize the value of your subsequent usage of Bait.
The Upgrade Priority: Hook/Line > Sinker
When spending your points at the Master Angler’s workshop, always follow this order:
- Hook and Line: These allow you to catch more fish per round and reach greater depths where rare fish spawn.
- Sinker: This only makes it easier to descend without hitting fish. Since you are already using the Edge Positioning Strategy to dodge fish effectively, the sinker is your lowest priority.
Using your vouchers to hit higher levels of the Fishing Guild panel early also rewards you with a second free Ocean Prospector Map, allowing you to repeat the high-score cycle before using your Bait for regular attempts.
Secret 5: The "Retreat" Reset Hack
This is the secret that separates the top 50 from the rest of the server. Many players accept a poor run where they hit a 1-star fish early on the descent or miss a treasure chest on the way up. You do not have to accept a bad outcome.
The No-Penalty Restart
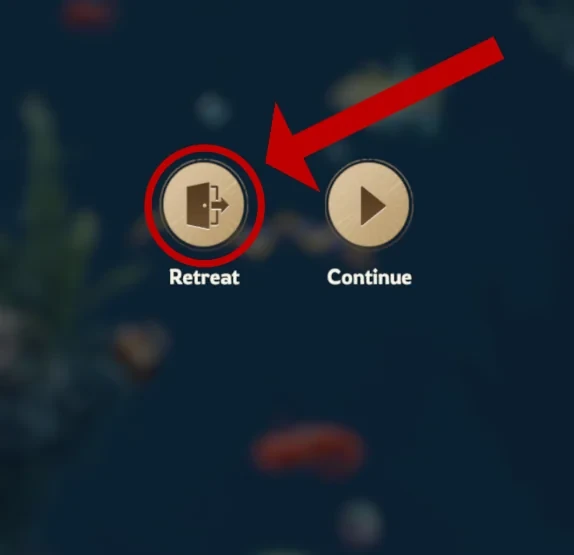
If you make a mistake, simply hit the Pause button in the top right corner and select Retreat before your ascent phase finishes.
- Zero Resource Loss: Retreating returns you to the menu without consuming your fishing attempt or any items used (like Prospector Maps or Vouchers).
- Static Spawns: When you re-enter the attempt, the game preserves the exact same layout. The rare fish, treasure chests, and rare artifacts will be in the identical locations at the same depths.
- The Mermaid Variation: The only thing that may change upon re-entry is the specific type of mermaid, but thus far we have only seen substitutes between non-seaweed mermaids that wouldn’t impact your results.
This "hack" allows you to treat every attempt as a practice run until you achieve a "Perfect Catch."
Secret 6: Rationing Attempts (The 0 UTC Server Refresh)
Free-to-play players receive one free attempt every 3 hours and can hold a maximum of 10. To stay competitive without spending, you must manage your "replenishment loop" with mathematical precision.
If you haven’t maxed out your fishing gear on day one because you are a non-spender, then you should aim to end the first day of the event with a full 10 out of 10 attempts remaining. This is because you will get another Ocean Prospector map for free at the 0 UTC refresh which makes all of those subsequent Bait attempts more valuable.
If you are at exactly 10 attempts, you will stop recharging for more attempts. However, each attempt takes 3 hours to recharge, so as long as you use that 10th attempt before 3 UTC, your total number of Bait you can use in the Fishing Tournament will remain unchanged. If that is not feasible due to your time zone, then you can stay at 8 or 9 out of 10 Bait going into the 0 UTC reset. It’s better to use those Baits suboptimally than not at all.
Secret 7: Advanced Hoarding and the "Pokédex" Strategy
For long-term players, the focus shifts from the leaderboard to completing the Fishing Guide (or what I call the "Fishi-dex"… it’s 150 fish after all!) Completing this guide provides permanent rewards, including rare skins and frames that are otherwise reserved for high spenders. You can do this more effectively in a few ways.
The Gem Shortcut
You do not need to spend real money on the Reel, Scanner, or Lantern consumable items. By clicking on their icons in the fishing menu, you can purchase them for 300 gems each.
- The Lantern is Mandatory: For any attempt where you aim to go below 300 meters, the Lantern is required to see the fish. Without it, you are effectively wasting the attempt.
- The Reel and Scanner: These are situational. The Reel allows you to hit more fish before reversing, and the Scanner helps locate rare species for your guide. Better skill levels can help remove the need for both of these “crutches” and help save you gems.
The Horn of the Tide
Every event provides one free Horn of the Tide, which allows you to summon a specific fish for your next attempt.
- Target Seasonal Rarities: Use the Horn on your very last attempt of the tournament to catch 5-star seasonal fish that won't reappear for months. If you catch them too early, you might waste the summon on a fish you would have encountered naturally later in the week.
The F2P Path to #1
Because Ocean Prospector maps and fishing vouchers carry over between tournaments, a patient free-to-play player can theoretically stockpile these items over several cycles. By skipping serious leaderboard attempts for many rotations and hoarding 10+ maps and vouchers, you can eventually have a single moonshot tournament where you score higher than the server’s whales and guarantee yourself a #1 rank and the temporary skin.
Conclusion: Fishing for Tempo
The Fishing Tournament is not just a minigame; it is a strategic pillar of Lordrush. By dodging fish on the edges, using the Retreat “hack” to ensure perfect scores, and hoarding your Prospector Maps for the right moment, you can significantly accelerate your Lordrush account tempo through better leaderboard rewards and completing your “Fishi-dex” without spending a dime.